How to Dry Water Under Flooring: Save Your Floor
Water under flooring can damage a subfloor in as little as 24 to 48 hours. During that time, trapped moisture creates the warm, dark, damp environment where mold can begin growing. If you notice a damp patch, a soft area underfoot, or a musty smell, you’re searching for one thing: how to dry water under flooring before the damage spreads.
The good news is that many cases involving water under flooring, including laminate, vinyl, LVP, tile, and hardwood, can be dried successfully if action is taken within the first two to three days. The right approach combines water extraction, proper airflow, and dehumidification instead of relying on heat alone.
In this guide, you’ll learn:
- How to identify water under flooring, even when there is no obvious leak
- The step-by-step process professionals use to dry floors in place
- Flooring-specific drying methods for laminate, vinyl, LVP/LVT, hardwood, and tile
- How to dry water under flooring in a bathroom, where hidden leaks are common
- How to determine whether your floor can dry naturally or needs removal
- Long-term solutions to prevent sweaty floors and condensation from returning
Why Water Gets Trapped Under Flooring
Most people immediately think of using a fan when they discover wet flooring, but the way moisture moves through flooring layers determines whether drying actually works and how well you can protect hardwood floors from long-term damage. Floors are built with multiple layers, including the wear surface, core, underlayment or vapor barrier, and subfloor, and each layer handles trapped water differently.
Common Causes of Water Under Flooring But No Leak
A common search is water under flooring but no leak, and it usually points to moisture that entered slowly rather than a sudden plumbing failure. When there is no active leak, the cause is often one of these:
- Condensation from temperature differences. A cold subfloor, especially above an unheated crawl space or concrete slab, can meet warm humid air indoors. The moisture then condenses beneath the floor surface, a problem often called “floor sweating.”
- Installation moisture. Concrete slabs can continue releasing residual moisture through a process called efflorescence for months or years after installation if a proper vapor barrier was not placed underneath.
- High indoor humidity. Homes with relative humidity above 60% can push moisture into porous flooring materials even without a visible spill.
- Appliance seepage. Washing machines, dishwashers, and refrigerator ice makers can release small amounts of water over time before a noticeable puddle appears.
Why Floors “Sweat”: Condensation vs. Leaks
Sweaty floors are caused by moisture in the air, not necessarily by a plumbing problem. Warm air holds more moisture, and when that humid air reaches a cold surface, such as flooring over a concrete slab in summer or an air-conditioned basement, it cools and releases water as condensation.
A leak brings water from a specific source, such as a pipe or appliance. Condensation works differently, so drying the floor alone will not solve the problem unless humidity levels are also controlled.
How Different Flooring Types Trap Moisture Differently
- Laminate flooring contains a fiberboard core that absorbs water quickly. Once moisture enters, swelling, bubbling, and lifting can appear within hours.
- Vinyl and LVP/LVT flooring resist water on the surface, but moisture can still enter through seams, edges, or click-lock joints and become trapped between the planks and subfloor.
- Hardwood flooring absorbs moisture through its grain, which can cause cupping as different areas of the wood expand at different rates.
- Tile flooring does not absorb water easily, but moisture trapped in the mortar bed or subfloor beneath the tile can remain hidden for weeks because the surface shows few visible signs.
How to Tell If You Have Water Under Your Flooring
Before starting the drying process, confirm where the moisture is located and how much water is involved. Many failed DIY drying attempts happen because the visible surface is treated while moisture remains underneath.
Visual Warning Signs
Watch for these signs, which often appear together:
- Discoloration, dark marks, or a darker shadow along seams
- Bubbling, lifting, or peeling around plank edges, especially with laminate and vinyl
- A soft, spongy, or slightly springy feeling when walking across the area
- A musty or earthy odor that appears before visible staining
- Baseboards that swell, change color, or begin separating from the wall
Moisture Meter Readings to Watch For
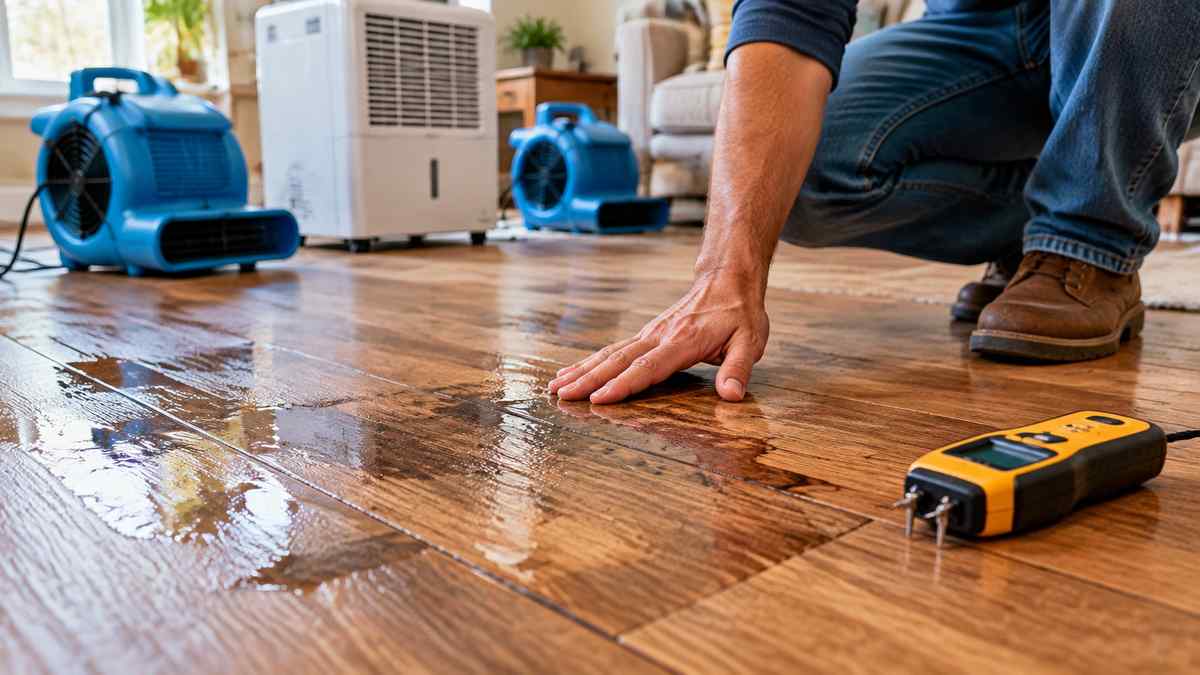
A pin-type or pinless moisture meter ($30–$60) is one of the most useful tools for checking water under flooring.
- Wood subfloors: above 16% moisture content indicates a problem; above 20% creates a high risk for mold and rot.
- Concrete slabs: above 4.5 lbs per 1,000 sq ft per 24 hours (calcium chloride test) indicates excess moisture.
Always compare readings from the affected area with a dry area in the same room. A comparison point gives a more accurate picture than relying on one measurement alone.
When Water Damage Is Hidden Under Vinyl or Laminate
This is where many how to remove water under flooring searches become confusing. A floor may look dry while moisture remains trapped underneath.
Vinyl plank flooring is especially known for hiding thin layers of water between the plank and subfloor. The surface may appear normal while moisture slowly damages the subfloor or adhesive below.
After any spill, appliance leak, or flooding event near vinyl or laminate flooring, check the moisture levels even if there are no obvious signs of damage.
Step-by-Step: How to Dry Water Under Flooring
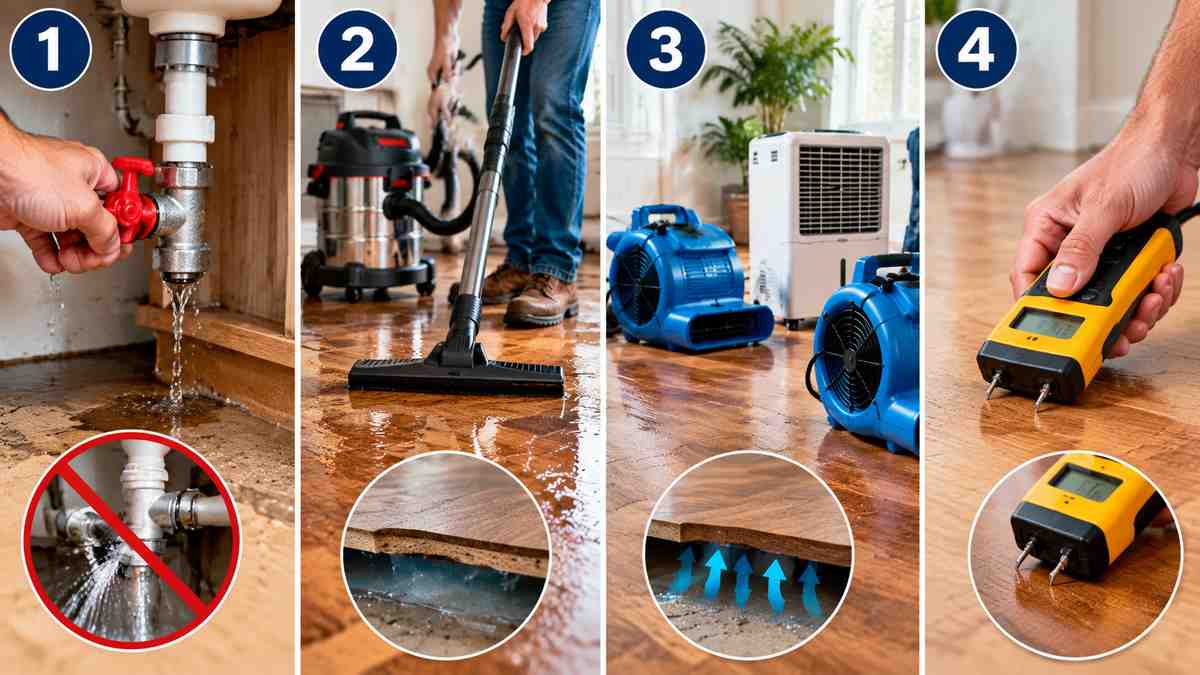
The basic drying process works for most flooring types, although the exact approach changes depending on the material. The goal is always the same: stop the source, remove as much water as possible, then dry the remaining moisture using airflow and dehumidification.
Step 1: Stop the Source and Contain the Spill
Before drying begins, find and stop where the water is coming from. Shut off leaking supply lines, disconnect damaged appliances, or address humidity problems causing condensation.
Drying will not work if new moisture continues entering the floor. Place towels around the outside edge of the wet area to prevent water from spreading into unaffected sections.
Step 2: Remove Standing Surface Water
Remove visible water immediately with a wet/dry shop vacuum.
If water has moved beneath the flooring surface, a shop vacuum with a flat attachment can sometimes pull moisture through seams and edges without removing the planks. Move slowly along joints and perimeter areas where water is most likely trapped.
Step 3: Create Airflow Without Removing the Floor
This is where many drying attempts fail. A regular box fan pointed at the floor surface mainly moves air above the flooring and does little to remove moisture trapped underneath.
For better results:
- Place air movers or box fans at a low angle so air moves across seams and joints where it can reach underneath the flooring.
- Run a dehumidifier in the same room. For an average bedroom-sized area, a unit rated for at least 30–50 pints per day is recommended.
- If available, professional drying systems such as injection drying or a “hardwood floor drying mat” system create negative air pressure that pulls moisture from beneath the floor. These systems can reduce drying time by 40–60% compared with fans alone.
Step 4: Monitor Moisture Levels Until Fully Dry
Do not judge dryness only by how the floor feels or smells. Check moisture meter readings every day until levels return to normal.
Most residential flooring takes about 2 to 5 days to dry after moderate water exposure when fans and a dehumidifier are used. Larger saturated areas and hardwood floors may require 5 to 10 days.
The surface may feel dry before the subfloor is actually dry. Subfloor moisture often remains 24–48 hours behind what is happening on the surface, so stopping equipment too early can leave hidden moisture behind.
Drying Methods by Flooring Type
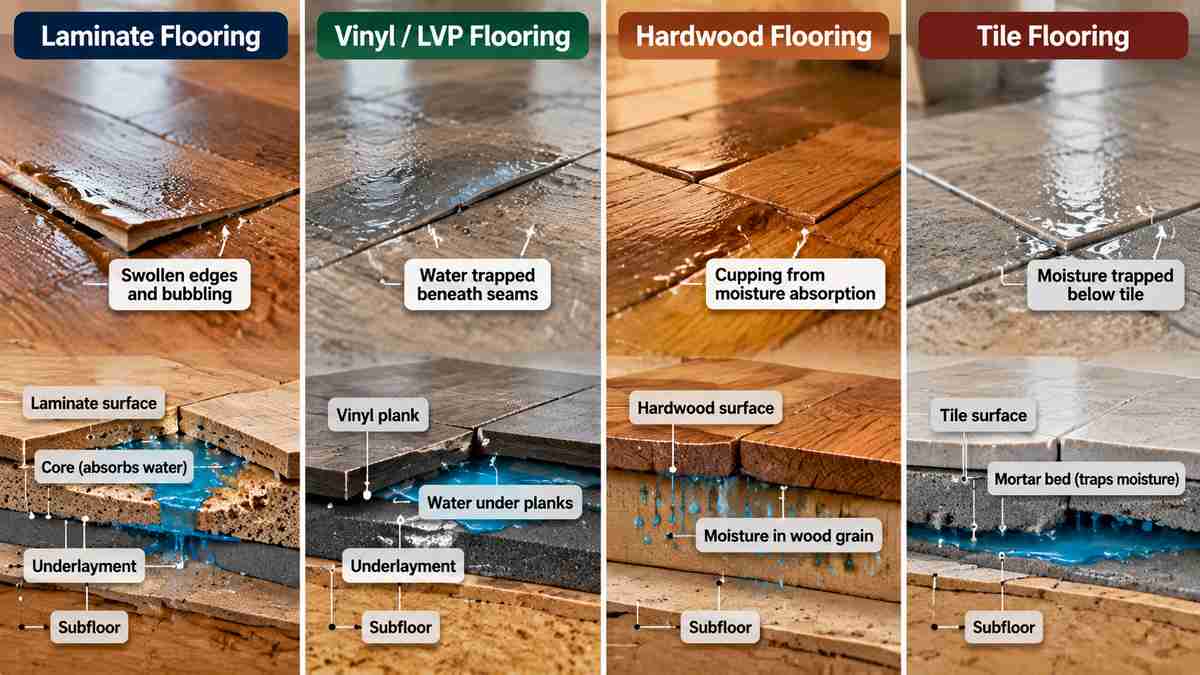
Different flooring materials react differently when moisture gets underneath them. A drying method that works for one type of floor may not work for another, which is why the material itself determines the best approach.
| Flooring Type | Typical Drying Time | Can Dry Without Removal? | DIY Difficulty | Risk of Permanent Damage |
| Laminate | 2–4 days | Sometimes (if caught within 24 hrs) | Moderate | High — swells fast, rarely reversible once bubbled |
| Vinyl / LVP / LVT | 3–5 days | Usually yes | Easy–Moderate | Low–Moderate (surface is water-resistant) |
| Hardwood | 5–10 days | Usually yes, slowly | Moderate–Hard | Moderate (cupping can self-correct if caught early) |
| Floating floors | 3–6 days | Yes, often just lift and re-lay | Easy | Low (designed to be removable) |
| Tile | 5–14 days (subfloor) | Rarely — grout traps moisture | Hard | Low for tile itself, high for subfloor if ignored |
How to Dry Water Under Laminate Flooring
Laminate requires quick action because its fiberboard core absorbs water easily and usually does not return to its original shape after swelling.
During the first 24 hours, dry water under laminate flooring by placing fans across the seams and using a dehumidifier to remove moisture from the room. If planks begin lifting, weighted boards can sometimes help keep them flat while they dry.
Once laminate has visible bubbling, edge curling, or separation between planks, drying alone usually will not restore the damaged sections. The answer to “will water under laminate dry out” depends heavily on how quickly the moisture is removed and whether swelling has already occurred.
How to Dry Water Under Vinyl and LVP/LVT Flooring
Vinyl plank flooring is more forgiving because the surface itself is water-resistant. The bigger concern is moisture trapped below the flooring, where it can affect the subfloor or weaken the adhesive.
To dry up water under vinyl flooring, remove loose baseboards or quarter-round trim to open the edges, place air movers along the perimeter, and check the subfloor with a moisture meter rather than testing only the vinyl surface.
For how to dry water under LVT flooring or LVP flooring, click-lock systems may allow one edge of the flooring to be separated carefully. This creates an opening where water can be extracted from underneath and speeds up drying compared with relying only on surface airflow.
How to Dry Water Under Hardwood and Floating Floors
Hardwood takes longer to dry because the wood absorbs moisture into its grain instead of only holding water on the surface.
Drying water under a hardwood floor requires continuous dehumidification, indoor humidity below 45%, and patience. Cupped boards may take 1–2 weeks to flatten if they recover at all. Even after a successful drying process, some remaining cupping can occur.
For floating floor installations, including laminate or engineered wood installed without nails or adhesive, the best solution for drying water under floating floor areas is often lifting the affected planks. Floating floors can usually be removed without damage, allowing direct airflow onto the subfloor before reinstalling once everything tests dry.
Drying Water Under Tile Floors
Tile itself is highly resistant to water, but moisture trapped beneath it in the mortar bed or concrete subfloor can take much longer to disappear.
Water beneath tile may remain for one to two weeks because air cannot easily reach the trapped area. If you suspect water under vinyl flooring on concrete or tile installed over concrete, focus on reducing room humidity with a dehumidifier and monitor moisture levels over time.
Concrete dries much slower than wood-based flooring materials, so weekly moisture checks are often more useful than daily checks in these situations.
How to Dry Water Under Flooring in a Bathroom
Bathrooms are especially prone to hidden flooring moisture because they combine frequent water exposure, high humidity, and tight spaces around fixtures where airflow is limited.
Why Bathrooms Trap Water Under Flooring More Often
Toilet wax ring failures, shower pan leaks, and dripping vanity supply lines are among the most common causes of water under flooring but no leak complaints in bathrooms.
These problems often do not create a visible puddle. Instead, water slowly escapes around fixture edges and moves into gaps between the flooring and subfloor.
Bathroom-Specific Drying Techniques
To dry water under flooring in a bathroom:
- Remove the toilet if the leak is coming from the base. This exposes the wax ring area and the surrounding subfloor, which otherwise cannot dry properly.
- Use a small, high-velocity air mover instead of a standard box fan. Bathroom spaces are limited, so focused airflow works better.
- Keep the exhaust fan running continuously during drying, not only when using the shower. This prevents room humidity from adding more moisture.
- Check the subfloor around toilets, tubs, and vanities carefully because these areas usually dry the slowest and are easiest to overlook.
Preventing Repeat Leaks After Drying
After the area is completely dry, replace the toilet wax ring (a $10–$15 part) if the toilet was loose or moved previously. Re-caulking tub and vanity edges with mildew-resistant silicone caulk also helps prevent future moisture problems.
These two repairs address many recurring bathroom flooring leaks reported by homeowners.
When Water Won’t Dry: Signs of Permanent Damage
Not every wet floor can be restored completely. Knowing when continued drying is no longer enough can save time and prevent further damage.
Will Water Under Laminate Dry Out on Its Own?
Laminate can lose its moisture over time, but the swelling caused by water damage usually does not reverse. The fiberboard core expands when it absorbs water and often stays permanently changed.
If laminate planks remain bubbled, separated at the seams, or soft underfoot after drying, the moisture problem may be solved, but the damaged sections still need replacement.
Signs Your Floor Needs Removal or Replacement
Consider removing or replacing flooring if you notice:
- A musty smell that remains after more than 5 days of active drying
- Visible mold or mildew growth, which can develop within 48–72 hours in warm, humid conditions
- Soft areas or movement in the subfloor even after the surface flooring has dried
- Moisture meter readings that stop improving despite continuous dehumidification
Mold Risk Timeline After Water Exposure
Restoration guidelines commonly identify 24–48 hours as the period when mold growth becomes a realistic concern in warm, humid conditions. After around 72 hours, mold may already be actively developing in materials that remain wet.
This is why early action matters. A quick drying attempt started immediately is often more effective than a more complete process started several days later.
Preventing Water and Condensation Under Flooring Long-Term
Drying the floor solves the immediate problem, but preventing the moisture source from returning is what protects the flooring long-term. This matters especially when condensation, rather than a single spill, caused the issue.
Humidity Control and Floor Sweating
If your floor repeatedly sweats, condensation may appear on tile or vinyl over a concrete slab, especially during warmer months. Lowering the humidity is the real solution.
Keeping indoor relative humidity between 30–50% with a whole-home dehumidifier or portable unit helps reduce recurring condensation on flooring surfaces.
Proper Underlayment and Vapor Barriers
If flooring needs to be replaced after water damage, it is a good opportunity to install proper vapor barrier underlayment.
For concrete subfloors, this is typically 6-mil polyethylene sheeting when a vapor barrier was not installed originally. Adding this layer is one of the most effective ways to reduce future moisture problems under laminate and floating floors.
Maintenance Tips for Pet Owners and Families
Homes with pets and young children often experience small spills that go unnoticed and slowly create moisture issues.
Clean spills quickly instead of allowing water from pet bowls or bath areas to remain on the floor. Use absorbent mats in areas with frequent water exposure, such as beneath water bowls and near bathroom entrances. A quarterly moisture meter check in kitchens and bathrooms can also identify problems before visible damage appears.
FAQ: Water Under Flooring
How long does it take for water to dry under flooring?
Most flooring dries in 2–5 days when fans and a dehumidifier are used. Laminate reacts quickly but has a higher chance of permanent swelling, while hardwood and tile subfloors may require 5–14 days because moisture penetrates deeper.
Will water under laminate dry out on its own?
The moisture itself can evaporate, but swollen or bubbled fiberboard planks usually will not return to their original shape. If the planks remain soft or lifted after drying, those sections generally need replacement even though the moisture issue has been fixed.
How do I dry up water under vinyl flooring without removing it?
Use air movers across seams, place a dehumidifier in the room, and remove baseboards if possible to improve airflow around plank edges. Vinyl’s water-resistant surface often allows drying in place within 3–5 days when the problem is found early.
Can water get under flooring with no leak at all?
Yes. Condensation, high humidity, cold subfloors, and moisture from concrete slabs can all create water under flooring without an active leak. This is especially common with tile and vinyl installed over concrete.
How do I know if there’s water trapped under my floor?
Look for soft areas, bouncing spots, seam discoloration, musty odors, bubbling, or lifted edges. A moisture meter reading compared with a dry area of the same room is the most reliable way to confirm hidden moisture.
Is it safe to just put a fan on wet flooring?
A single fan moving air across the surface usually does not reach moisture trapped below the flooring. Air movers positioned along seams and edges, combined with a dehumidifier, remove moisture much more effectively.
How do I dry water under floorboards or floating floors?
Floating floors can often be lifted by unclicking the affected boards, allowing direct airflow onto the subfloor. Drying the exposed area is usually faster and more thorough than trying to remove moisture through the intact flooring.
When should I call a professional instead of DIY drying?
Professional help is recommended if moisture readings stop improving after several days, mold odors or visible growth appear, or the affected area is larger than roughly 100 square feet. Restoration equipment is designed to handle large or slow-drying areas more efficiently than standard household tools.
Conclusion
Water under flooring can often be repaired if the moisture is addressed quickly and the drying process is done correctly.
The main steps are straightforward: stop the source, remove standing water, direct airflow across seams and joints, and continue monitoring moisture levels until readings return to normal. A floor feeling dry on the surface does not always mean the subfloor underneath is dry.
Whether the problem involves laminate, vinyl, LVP, hardwood, or tile, fast action and correct airflow placement matter most. If moisture levels stop improving or mold appears during the first week, professional restoration may be necessary before permanent subfloor damage develops.
If you caught the problem early, start with a moisture meter, set up fans and a dehumidifier, and begin drying immediately. The first 48 hours are the most important.